What Causes Water Damage in the Bathroom
What Causes Water Damage in the Bathroom
Blog Article
Just how do you feel in relation to How to Repair and Prevent Bathroom Water Damage??
Water damage often occurs in the washroom due to the water used everyday. Often, the damage could be a little mold from the shower. Various other times, it's huge damages on your floor. Whatever it is, it is always excellent to know the cause and also prevent it before it takes place.
This guide will experience some of the typical sources of water damage in the bathroom. We will likewise analyze what you can do to prevent these causes from harming your bathroom. Let's dive in.
5 Typical Sources Of Water Damage in Bathrooms
These are the typical factors you would certainly have water damage in your washrooms and exactly how you can identify them:
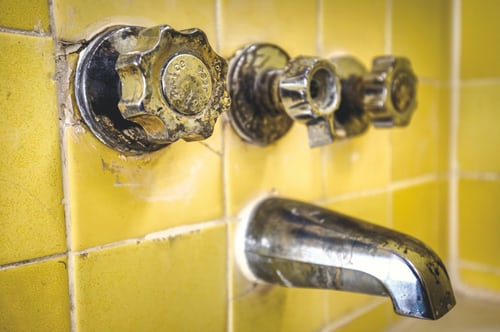
Ruptured or Leaking Pipes
There are numerous pipelines lugging water to different parts of your bathroom. Some pipes take water to the commode, the sink, the taps, the shower, as well as several other locations. They crisscross the little location of the bathroom.
Every so often, these pipelines can get rustic as well as ruptured. Various other times, human action might trigger them to leakage. When this takes place, you'll find water in the corners of your restroom or on the wall surface.
To detect this, look out for bubbling walls, mold and mildews, or mold. Call a specialist emergency plumber to fix this when it occurs.
Fractures in your wall surface floor tilesv
Washroom wall tiles have been specially designed for that purpose. They safeguard the wall from moisture from people taking showers. However, they are not unbreakable.
In some cases, your shower room wall surface ceramic tiles fracture as well as permit some dampness to permeate right into the wall surface. This can possibly damage the wall surface if you do not take any kind of activity. If you observe a fracture on your wall surface ceramic tiles, repair it promptly. Do not wait up until it ruins your wall.
Overflowing toilets and sinks
As humans, sometimes we make mistakes that could create some water damage in the washroom. As an example, leaving your sink faucet on might trigger overflowing and damage to other parts of the washroom with dampness.
Additionally, a malfunctioning bathroom could cause overruning. As an example, a busted bathroom deal with or other parts of the cistern. When this takes place, it can damage the floor.
As soon as you see an overruning sink or bathroom, call a plumbing to help deal with it quickly.
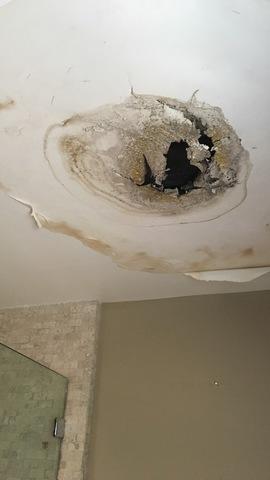
Roofing Leaks
Sometimes, the trouble of water damage to the shower room may not come from the washroom. For instance, a roofing system leakage can trigger damage to the washroom ceiling. You can find the damage done by considering the water spots on the ceiling.
If you find water discolorations on your ceiling, inspect the roof to see if it's harmed. Then, call a professional to aid resolve the issue.
Excess Wetness
It's amazing to have that long shower as well as splash water while you hem and haw as well as imitate you're doing, but occasionally these acts might create water damage to your shower room.
Splashing water around can trigger water to go to edges and create molds. See exactly how you spread out excess wetness around, and also when you do it, clean it up to avoid damages.
Final thought
Water damage to your washroom can be bothersome. However, you can manage it if you prevent a few of the reasons discussed in this overview. Call an expert emergency situation plumbing if you see any serious damage.
HOW TO FIX A WATER-DAMAGED BATHROOM
MOLD INSPECTION AND REMEDIATION
The first step before beginning your bathroom renovation should be a thorough inspection for mold.
If you can detect mold growth in the bathroom by its musty odor or the stains it leaves on walls and surfaces, you can be sure the fungus is hiding somewhere behind your bathroom’s drywall or under the subfloor.
In-home tests can help you detect mold, but they aren’t 100 percent foolproof.
If you suspect the water-damaged bathroom walls or flooring are hiding large mold infestations, it’s best to contact a certified mold remediation company and arrange for an inspection.
If the restoration contractor confirms the presence of mold, you can get to work on removal and remediation. However, handling this kind of work yourself can be a health hazard, and you can’t be sure of removing it all with DIY techniques.
Consider turning the job over to your restoration professionals. Their certified technicians have the skills and tools it takes to get the job done. Most importantly, you’re not putting yourself or your family’s health at risk.
PREPARE THE ROOM
Once the mold has been removed, begin gathering materials and preparing the bathroom for renovation.
Shut off your home’s main water valve to prevent further damage in case of a mishap while you’re working. Disconnect the toilet from the floor and the waterline.
With the toilet out of the way, you’ll have room to work removing other damaged items or fixtures that need replacing. This might include your cabinetry, tile or vinyl floor and wood subflooring.
START WITH THE DRYWALL
If water damage left the bathroom structurally compromised, your DIY project may turn into a job for a professional. However, if it only affects small portions of drywall, use a hammer and keyhole saw to remove damaged areas. Cut the drywall in a circular or rectangular shape so that it’s easier to patch.
Depending on the size of the area you’re working with, patch or replace the drywall. If you’re patching, use clips to hold new material in place, and secure with tape and joint compound. Once the compound dries, sand down the patch so that it’s flush with the surrounding drywall.
Now you’re ready to prime and paint over the repaired area. This might be a great opportunity to repaint the entire bathroom.
REPAIR THE BATHROOM FLOOR WATER DAMAGE
Clean up debris from the drywall repair, and prep the bathroom floor. Start by clearing the damaged area and pulling up the vinyl or tile. You may need to move out cabinets and the toilet. Follow up by removing any protruding nails, screws and adjacent baseboards.
Draw a strait-edge line through the center of exposed joists on either side of the damaged floor. Using this as your guide, cut out the subfloor material with a circular saw. Let joists dry.
Carefully measure replacement oriented strand board or plywood, and cut to fit. Secure the fresh subfloor in place with wood screws, apply adhesive, and lay down replacement vinyl flooring.
If you’re replacing tile, you’ll need to install concrete board over the plywood. Set the new tile with thin-set mortar, let it dry, and finish by grouting tile joints.
INSTALL THE FIXTURES
Once your walls and floors are complete, replace or install new cabinetry, the toilet and anything else you removed before the bathroom renovation. If you’ve always wanted new light fixtures or a new paint color, this is the perfect time to update the room’s looks.
Be sure to clean up all debris and address damp areas before you replace anything. Otherwise, you’ll end up in the same predicament in the near future.
HOW TO PREVENT BATHROOM WATER DAMAGE
It’s probably the wettest room in the house, but all that damp doesn’t have to cause problems. These simple tips help prevent water damage in bathroom walls and floors.
Always investigate discoloration on bathroom walls and baseboards.
Regularly check floor and walls tiles for damaged grout or caulking.
Don’t ignore drains that seem slow or are leaking in sinks and tubs.
Keep bathroom floors dry with absorbent bath mats.
Replace leaky faucets, shower heads and overflow tub drains.
Control bathroom humidity by installing an exhaust fan.
Know how to turn off bathroom supply line shut-off valves.
Make sure you have contact information for an experienced water damage company.
https://www.servicemasterbyzaba.com/blog/bathroom-water-damage/
HOW TO FIX A WATER-DAMAGED BATHROOM
MOLD INSPECTION AND REMEDIATION
The first step before beginning your bathroom renovation should be a thorough inspection for mold.
If you can detect mold growth in the bathroom by its musty odor or the stains it leaves on walls and surfaces, you can be sure the fungus is hiding somewhere behind your bathroom’s drywall or under the subfloor.
In-home tests can help you detect mold, but they aren’t 100 percent foolproof.
If you suspect the water-damaged bathroom walls or flooring are hiding large mold infestations, it’s best to contact a certified mold remediation company and arrange for an inspection.
If the restoration contractor confirms the presence of mold, you can get to work on removal and remediation. However, handling this kind of work yourself can be a health hazard, and you can’t be sure of removing it all with DIY techniques.
Consider turning the job over to your restoration professionals. Their certified technicians have the skills and tools it takes to get the job done. Most importantly, you’re not putting yourself or your family’s health at risk.
PREPARE THE ROOM
Once the mold has been removed, begin gathering materials and preparing the bathroom for renovation.
Shut off your home’s main water valve to prevent further damage in case of a mishap while you’re working. Disconnect the toilet from the floor and the waterline.
With the toilet out of the way, you’ll have room to work removing other damaged items or fixtures that need replacing. This might include your cabinetry, tile or vinyl floor and wood subflooring.
START WITH THE DRYWALL
If water damage left the bathroom structurally compromised, your DIY project may turn into a job for a professional. However, if it only affects small portions of drywall, use a hammer and keyhole saw to remove damaged areas. Cut the drywall in a circular or rectangular shape so that it’s easier to patch.
Depending on the size of the area you’re working with, patch or replace the drywall. If you’re patching, use clips to hold new material in place, and secure with tape and joint compound. Once the compound dries, sand down the patch so that it’s flush with the surrounding drywall.
Now you’re ready to prime and paint over the repaired area. This might be a great opportunity to repaint the entire bathroom.
REPAIR THE BATHROOM FLOOR WATER DAMAGE
Clean up debris from the drywall repair, and prep the bathroom floor. Start by clearing the damaged area and pulling up the vinyl or tile. You may need to move out cabinets and the toilet. Follow up by removing any protruding nails, screws and adjacent baseboards.
Draw a strait-edge line through the center of exposed joists on either side of the damaged floor. Using this as your guide, cut out the subfloor material with a circular saw. Let joists dry.
Carefully measure replacement oriented strand board or plywood, and cut to fit. Secure the fresh subfloor in place with wood screws, apply adhesive, and lay down replacement vinyl flooring.
If you’re replacing tile, you’ll need to install concrete board over the plywood. Set the new tile with thin-set mortar, let it dry, and finish by grouting tile joints.
INSTALL THE FIXTURES
Once your walls and floors are complete, replace or install new cabinetry, the toilet and anything else you removed before the bathroom renovation. If you’ve always wanted new light fixtures or a new paint color, this is the perfect time to update the room’s looks.
Be sure to clean up all debris and address damp areas before you replace anything. Otherwise, you’ll end up in the same predicament in the near future.
HOW TO PREVENT BATHROOM WATER DAMAGE
It’s probably the wettest room in the house, but all that damp doesn’t have to cause problems. These simple tips help prevent water damage in bathroom walls and floors.
https://www.servicemasterbyzaba.com/blog/bathroom-water-damage/
As a keen person who reads about How to Repair and Prevent Bathroom Water Damage?, I imagined sharing that post was smart. Are you aware of anybody else who is involved in the niche? Take a moment to share it. Thanks for going through it.
Free Estimates Report this page